
N64 ControllersA restoration guide in pictures

The Nintendo-64 system is, without a doubt, one of the biggest pieces of nostalgic gaming machinery. Whether or not you are a fan of Nintendo's particular works, there is almost no doubt that you've played and enjoyed one of the many games made for this system. This is mostly due to the N64 having a large and varied library of available games.
[Img_Inline Width="210" Caption=If you even THINK about replacing it, you should slap yourself. Align="left"]http://t2.gstatic.com/images?q=tbn:ANd9GcSPQZsXU4LRV11URV-oGfyVu5tKcvrFxN6OBfrW5ItOqFpDkYuB&t=1[/Img_Inline]
If you enjoyed some of Nintendo's older titles, the Mario and Zelda franchise's made some of their strongest impressions with this console. If you just liked platformers in general, the whole system is widely known for them. A little too old for the kiddy games? How about giving Goldeneye, Perfect Dark, or Conker's Bad Fur Day a try? Most of the games were designed with two players in mind too, so that you don't have to play them alone.
If there was a specific type of game you liked, there was one on the Nintendo 64 console. So enjoyable was it, that most people still own and play them down to this day.
Unfortunately, the controllers that were made for the N-64 are rather flimsy. While you CAN go out and buy after-market controllers, the N64 had a wide variety of rare and specially colored controllers that are not only valuable, but extremely difficult to find.
So, what can you do? Don't worry! Even though the N-64 controller is one of the easiest controllers to break, Nintendo also made it one of the easiest to repair, and this guide is designed to detail every piece and common failure-point for your use.
PLEASE NOTE: I have only taken into account failures and damage caused by regular use and aging, and take no responsibility for damage caused by improper handling of the electronics, individual components, or the chemicals used during the "Cleaning" section outlined in this guide; though I will include warnings for potential dangers.
The Components
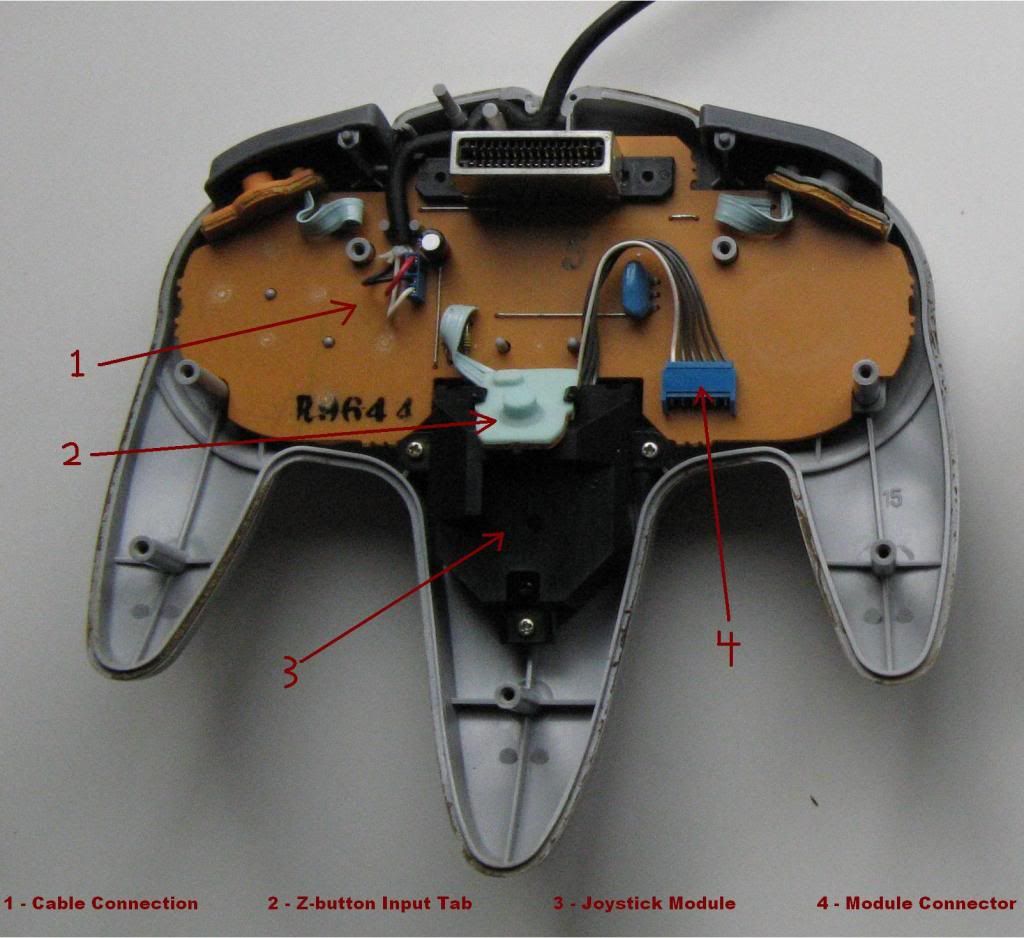
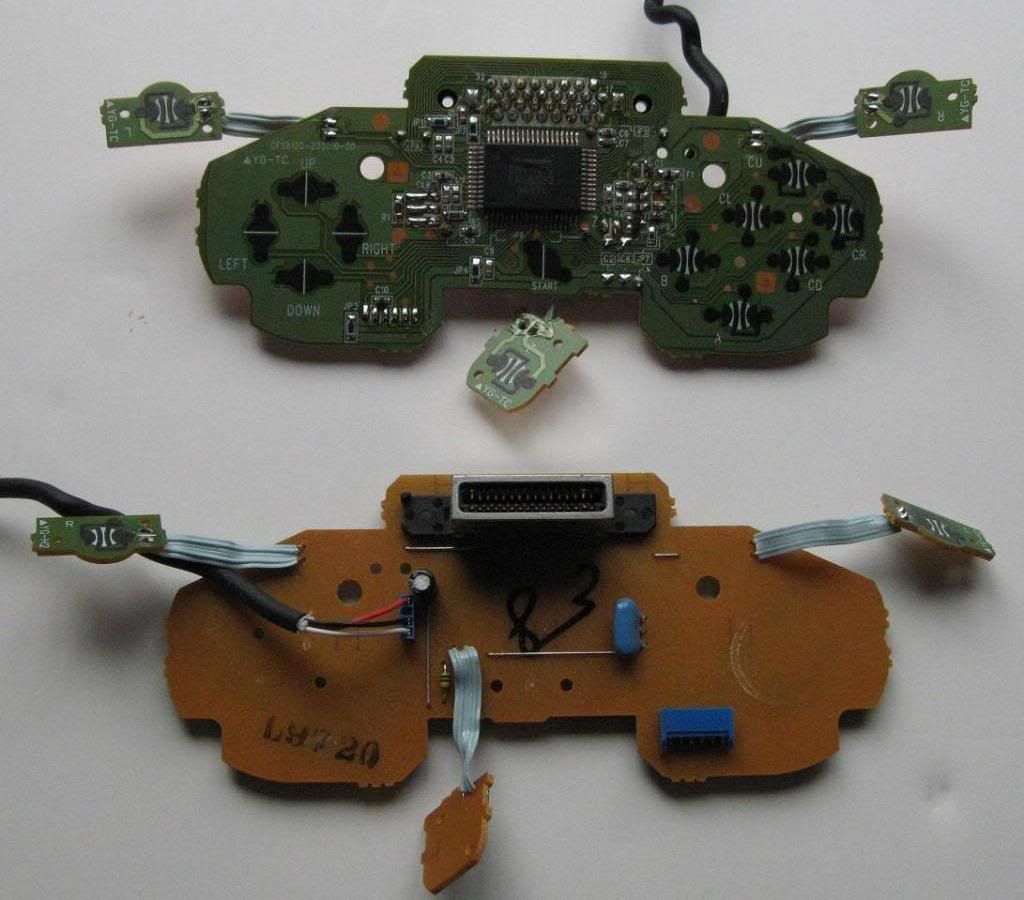
Despite having one of the widest arrays of controls in gaming history, the individual pieces that make up an N-64 controller a surprisingly few. Held together by the plastic casing is nothing more than one circuit board (with three hard-wired contact boards attached), 6 rubber contact patches that act as springs for the buttons, 11 buttons that are each individually keyed into the casing to prevent mix-ups, and a separate self-contained module for the thumbstick.
Each of these components is easily replaceable with any component out of another controller, so having a damaged piece isn't going to kill your project. Controllers with a cut cable or missing piece can easily be found for cheap, and can be used to farm for replacement parts.
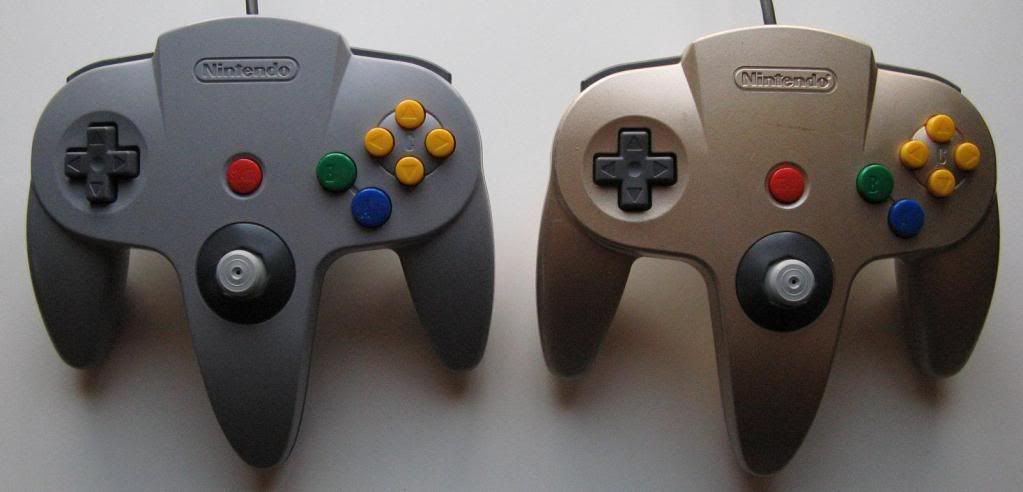
For my case in particular, the N-64 system that I discovered had two controllers with it (casings pictured below). One of them (the one on the left) was severely stained with nicotine. A quick search for an extra casing online showed me a somewhat-rare Golden controller that had a damaged circuit board, going for $1.00(U.S.). So, by swapping the good electronics from the stained controller into the Golden controller casing, I managed to give the rarity a new life.

Buttons
The buttons on a typical N-64 controller rarely break. If they are broken, though, the only real way to repair the controller is to replace them. If the small tabs that act as positioning keys and guides break or the button is somehow shattered, there is no repairing it, mostly due to the size of the involved pieces.
[Img_Inline Width="260" Caption=The tablet pictured on the right corresponds to these particular contacts. Align="left"]http://i1088.photobucket.com/albums/i332/Skorpyo/N64/N64Cont025.jpg?t=1302987834[/Img_Inline]
[Img_Inline Width="250" Caption=One of these. Stop thinking about toast. Align="right"]http://i1088.photobucket.com/albums/i332/Skorpyo/N64/buttonjelly.jpg?t=1302981777[/Img_Inline]
As for a button that is collapsed, it is much the same story, but concerns a whole different piece of the controller. Namely, the jelly-tablets.
Yes, I said the Jelly-tablets.
Throughout the controller, each and every one of the buttons uses one of these tabs. The directional cross has one with four contacts, the START, Z, L, and R buttons all have their own individual tab, and the A, B, and the four C buttons all share one large tablet with six contacts, shown here.
These tablets consist of a black contact pad for each button, that contacts a set of circuits on the main controller board, or on one of the wired contact boards; and a layer of springy, gelatinous rubber. Much like the buttons used on "Silent" or "Roll-up" keyboards, the raised portion of rubber gives way under a certain force, and then returns to its normal shape when the force is released. This allows for each button to have a solid, springy feel without introducing potentially hazardous metal springs to the controller board.
On rare occasions, the rubber can deteriorate or tear, causing the effected button to collapse and possibly work erratically. When this happens, the only course of action to take that presents a permanent fix is to swap it with a good tablet out of another controller.
Thumb-sticks
By far the most easily damaged or worn component of any N-64 controller is the Thumb-Stick. Almost universally, the stick is used as the main movement function. When it comes to controls, it works well enough, considering that moving between the stick and the D-pad is quite awkward, leaving the D-pad as the least used portion of any N-64 controller.
[Img_Inline Width="210" Caption=Original Thumb-Stick: notice the presence of worn-off plastic. Align="left"]http://i1088.photobucket.com/albums/i332/Skorpyo/N64/thumbstick.jpg?t=1302982993[/Img_Inline]
[Img_Inline Width="210" Caption=Replacement, provided by www.nintendorepairshop.com Align="right"]http://i1088.photobucket.com/albums/i332/Skorpyo/N64/thumbstick2.jpg?t=1302983093[/Img_Inline]
Unfortunately, the thumb-sticks provided by Nintendo are incredibly flimsy things, consisting of a tiny ball-pivot, heavy spring rate, and largely delicate pieces used within the module. Many times a controller will have a floppy (if not entirely loose), unresponsive stick. While they can be disassembled and re-tensioned, the thumb-stick is better off being replaced, as the pivots and joints inside will most likely be turning into plastic dust.
As such, aftermarket sticks are often the best way to go, and even provide for some modification. For instance, while you can order a stick made by Nintendo that works and behaves just like the originals, I opted to go for a third-party stick that featured a smooth, heavy spring rate, and a very durable large ball-pivot, akin to PlayStation or X-box controllers. Replacement consists simply of removing three screws, unplugging the old module, and installing the new one.
Cables and Wires
[Img_Inline Width="210" Caption=The Red, Black, and White wires in the center are the main cable. The light blue ribbon-cables go to the R and Z buttons. Align="left"]http://i1088.photobucket.com/albums/i332/Skorpyo/N64Cont024.jpg?t=1302984238[/Img_Inline]
When in comes to controllers in general, another common failure is the cabling. Controllers get thrown around, cables get yanked out of hands and consoles, stepped on, possibly even cut. As such, the cable itself may require replacement, and can render the entire controller as trash. Fortunately, there is no reason to dispose of that Uber-rare Pokemon N-64 controller.
There are a plethora of extension cables available for the N-64 controller, with different lengths and colors available. Besides this, the wires used inside the cables consist of braided copper instead of aluminum. Thanks to this fact, all that stands between throwing a controller away and keeping it is a bit of soldering and heat-shrink tubing.
Simply cut the end of the cable meant for inserting the controller into, strip the rubber covering back about 1/2 inch, and solder the color-coded wires from the new cable onto the same-colored wires present in the controller.
The only time that this repair cannot be performed is if the wires are pulled out of the contacts on the board itself, or if that same area is burnt.
Besides the main cable, there are also the wires that go to the individual contact patches for the L, R, and Z buttons. If any of these are damaged, the main board must be replaced.
Plastic Casings
[Img_Inline Width="210" Caption=a whole decade of nastiness. Align="right"]http://i1088.photobucket.com/albums/i332/Skorpyo/N64/dirt.jpg?t=1302984972[/Img_Inline]
[Img_Inline Width="250" Caption=Look at all the lovely filth. Align="left"]http://i1088.photobucket.com/albums/i332/Skorpyo/N64/acidbath.jpg?t=1302987387[/Img_Inline]
However, the main reason one would want to mess about with the plastic casing for a controller isn't damage. Between the grease and dirt on your hands, grime from snacks, and the possible application of crayon or stickers to an N-64 controller, the casing WILL become a massive, disgusting ball of filth in little time. After many years of use, the seams and areas between the buttons and controller will fill with green residue, consisting of skin-flakes, food, dust, and sometimes nicotine.
While you can pick away at the big garbage with a house-hold cleaner, the only real way to get the controllers perfectly clean is to bathe them in a chemical bath. When I was attempting to create a batch of "Retr0Brite" liquid, a chemical mixture used to remove staining and age-yellowing from ABS-type plastics (Recipe available for free <a href=http://retr0bright.wikispaces.com/home>Here), I instead created a powerful cleaning agent by accidentally messing with the formula. I recommend you don't mix your own chemical concoctions at home, kiddies.
Aftermath
With all of the plastic pieces clean and dry, you can reassemble the controller. Simply insert the plastic buttons, followed by the jelly tabs and then the circuit board. After you install the joystick, you can put the jelly tabs back on the L, R, and Z button contact pads, and re-insert them into their designated slots. Finish installing all of the buttons in the casings (the Z button goes on the rear-half), snake the cable back around the two supporting posts in the top of the controller, and re-install the back. After all nine of the screws have been tightened, you can test the operation of the controller.
Normally, I'd be posting a review of an older game that I've been playing all week, just to share with my fellow Escapists about it. However, I've recently come into possession of an abandoned Nintendo-64 console, and have made a weeks-long project of restoring the system. As for this weeks post, I figured that the best way to keep with my previous writings was to spread some information on how to restore the most commonly broken portion of the Nostalgia-machine that is the N64: the controllers. Enjoy!
The Nintendo-64 system is, without a doubt, one of the biggest pieces of nostalgic gaming machinery. Whether or not you are a fan of Nintendo's particular works, there is almost no doubt that you've played and enjoyed one of the many games made for this system. This is mostly due to the N64 having a large and varied library of available games.
[Img_Inline Width="210" Caption=If you even THINK about replacing it, you should slap yourself. Align="left"]http://t2.gstatic.com/images?q=tbn:ANd9GcSPQZsXU4LRV11URV-oGfyVu5tKcvrFxN6OBfrW5ItOqFpDkYuB&t=1[/Img_Inline]
If you enjoyed some of Nintendo's older titles, the Mario and Zelda franchise's made some of their strongest impressions with this console. If you just liked platformers in general, the whole system is widely known for them. A little too old for the kiddy games? How about giving Goldeneye, Perfect Dark, or Conker's Bad Fur Day a try? Most of the games were designed with two players in mind too, so that you don't have to play them alone.
If there was a specific type of game you liked, there was one on the Nintendo 64 console. So enjoyable was it, that most people still own and play them down to this day.
Unfortunately, the controllers that were made for the N-64 are rather flimsy. While you CAN go out and buy after-market controllers, the N64 had a wide variety of rare and specially colored controllers that are not only valuable, but extremely difficult to find.
So, what can you do? Don't worry! Even though the N-64 controller is one of the easiest controllers to break, Nintendo also made it one of the easiest to repair, and this guide is designed to detail every piece and common failure-point for your use.
PLEASE NOTE: I have only taken into account failures and damage caused by regular use and aging, and take no responsibility for damage caused by improper handling of the electronics, individual components, or the chemicals used during the "Cleaning" section outlined in this guide; though I will include warnings for potential dangers.
The Components
Despite having one of the widest arrays of controls in gaming history, the individual pieces that make up an N-64 controller a surprisingly few. Held together by the plastic casing is nothing more than one circuit board (with three hard-wired contact boards attached), 6 rubber contact patches that act as springs for the buttons, 11 buttons that are each individually keyed into the casing to prevent mix-ups, and a separate self-contained module for the thumbstick.
Each of these components is easily replaceable with any component out of another controller, so having a damaged piece isn't going to kill your project. Controllers with a cut cable or missing piece can easily be found for cheap, and can be used to farm for replacement parts.
For my case in particular, the N-64 system that I discovered had two controllers with it (casings pictured below). One of them (the one on the left) was severely stained with nicotine. A quick search for an extra casing online showed me a somewhat-rare Golden controller that had a damaged circuit board, going for $1.00(U.S.). So, by swapping the good electronics from the stained controller into the Golden controller casing, I managed to give the rarity a new life.
Buttons
The buttons on a typical N-64 controller rarely break. If they are broken, though, the only real way to repair the controller is to replace them. If the small tabs that act as positioning keys and guides break or the button is somehow shattered, there is no repairing it, mostly due to the size of the involved pieces.
[Img_Inline Width="260" Caption=The tablet pictured on the right corresponds to these particular contacts. Align="left"]http://i1088.photobucket.com/albums/i332/Skorpyo/N64/N64Cont025.jpg?t=1302987834[/Img_Inline]
[Img_Inline Width="250" Caption=One of these. Stop thinking about toast. Align="right"]http://i1088.photobucket.com/albums/i332/Skorpyo/N64/buttonjelly.jpg?t=1302981777[/Img_Inline]
As for a button that is collapsed, it is much the same story, but concerns a whole different piece of the controller. Namely, the jelly-tablets.
Yes, I said the Jelly-tablets.
Throughout the controller, each and every one of the buttons uses one of these tabs. The directional cross has one with four contacts, the START, Z, L, and R buttons all have their own individual tab, and the A, B, and the four C buttons all share one large tablet with six contacts, shown here.
These tablets consist of a black contact pad for each button, that contacts a set of circuits on the main controller board, or on one of the wired contact boards; and a layer of springy, gelatinous rubber. Much like the buttons used on "Silent" or "Roll-up" keyboards, the raised portion of rubber gives way under a certain force, and then returns to its normal shape when the force is released. This allows for each button to have a solid, springy feel without introducing potentially hazardous metal springs to the controller board.
On rare occasions, the rubber can deteriorate or tear, causing the effected button to collapse and possibly work erratically. When this happens, the only course of action to take that presents a permanent fix is to swap it with a good tablet out of another controller.
Thumb-sticks
By far the most easily damaged or worn component of any N-64 controller is the Thumb-Stick. Almost universally, the stick is used as the main movement function. When it comes to controls, it works well enough, considering that moving between the stick and the D-pad is quite awkward, leaving the D-pad as the least used portion of any N-64 controller.
[Img_Inline Width="210" Caption=Original Thumb-Stick: notice the presence of worn-off plastic. Align="left"]http://i1088.photobucket.com/albums/i332/Skorpyo/N64/thumbstick.jpg?t=1302982993[/Img_Inline]
[Img_Inline Width="210" Caption=Replacement, provided by www.nintendorepairshop.com Align="right"]http://i1088.photobucket.com/albums/i332/Skorpyo/N64/thumbstick2.jpg?t=1302983093[/Img_Inline]
Unfortunately, the thumb-sticks provided by Nintendo are incredibly flimsy things, consisting of a tiny ball-pivot, heavy spring rate, and largely delicate pieces used within the module. Many times a controller will have a floppy (if not entirely loose), unresponsive stick. While they can be disassembled and re-tensioned, the thumb-stick is better off being replaced, as the pivots and joints inside will most likely be turning into plastic dust.
As such, aftermarket sticks are often the best way to go, and even provide for some modification. For instance, while you can order a stick made by Nintendo that works and behaves just like the originals, I opted to go for a third-party stick that featured a smooth, heavy spring rate, and a very durable large ball-pivot, akin to PlayStation or X-box controllers. Replacement consists simply of removing three screws, unplugging the old module, and installing the new one.
Cables and Wires
[Img_Inline Width="210" Caption=The Red, Black, and White wires in the center are the main cable. The light blue ribbon-cables go to the R and Z buttons. Align="left"]http://i1088.photobucket.com/albums/i332/Skorpyo/N64Cont024.jpg?t=1302984238[/Img_Inline]
When in comes to controllers in general, another common failure is the cabling. Controllers get thrown around, cables get yanked out of hands and consoles, stepped on, possibly even cut. As such, the cable itself may require replacement, and can render the entire controller as trash. Fortunately, there is no reason to dispose of that Uber-rare Pokemon N-64 controller.
There are a plethora of extension cables available for the N-64 controller, with different lengths and colors available. Besides this, the wires used inside the cables consist of braided copper instead of aluminum. Thanks to this fact, all that stands between throwing a controller away and keeping it is a bit of soldering and heat-shrink tubing.
Simply cut the end of the cable meant for inserting the controller into, strip the rubber covering back about 1/2 inch, and solder the color-coded wires from the new cable onto the same-colored wires present in the controller.
The only time that this repair cannot be performed is if the wires are pulled out of the contacts on the board itself, or if that same area is burnt.
Besides the main cable, there are also the wires that go to the individual contact patches for the L, R, and Z buttons. If any of these are damaged, the main board must be replaced.
Plastic Casings
When it comes to the controller casing, any damage is pretty much a permanent affair. Unless you are a massive Modder and can perform some Polymer-wizardry, there is little-to-nothing you can do. As such, replacement is the name of the game here.WARNING: I will be posting a cleaning method below that consists of using Hydrogen Peroxide and Phosphoric Acid, both of which can cause chemical burns to the skin and damage to the eyes. I urge you to use Nylon Gloves and sufficient safety eye-wear when using these chemicals.
[Img_Inline Width="210" Caption=a whole decade of nastiness. Align="right"]http://i1088.photobucket.com/albums/i332/Skorpyo/N64/dirt.jpg?t=1302984972[/Img_Inline]
[Img_Inline Width="250" Caption=Look at all the lovely filth. Align="left"]http://i1088.photobucket.com/albums/i332/Skorpyo/N64/acidbath.jpg?t=1302987387[/Img_Inline]
However, the main reason one would want to mess about with the plastic casing for a controller isn't damage. Between the grease and dirt on your hands, grime from snacks, and the possible application of crayon or stickers to an N-64 controller, the casing WILL become a massive, disgusting ball of filth in little time. After many years of use, the seams and areas between the buttons and controller will fill with green residue, consisting of skin-flakes, food, dust, and sometimes nicotine.
While you can pick away at the big garbage with a house-hold cleaner, the only real way to get the controllers perfectly clean is to bathe them in a chemical bath. When I was attempting to create a batch of "Retr0Brite" liquid, a chemical mixture used to remove staining and age-yellowing from ABS-type plastics (Recipe available for free <a href=http://retr0bright.wikispaces.com/home>Here), I instead created a powerful cleaning agent by accidentally messing with the formula. I recommend you don't mix your own chemical concoctions at home, kiddies.
[Img_Inline Width="210" Align="left"]http://i1088.photobucket.com/albums/i332/Skorpyo/N64/untitled2.jpg?t=1302986176[/Img_Inline]
By using a mixture of salon-type Hydrogen Peroxide (A mixture of %6 concentration of HP and Phosphoric acid, available at beauty supply stores), Oxy-Clean (Any cleaning product with "Oxy" in the title will work), and water all mixed into a large bowl, I was able to soak both controller casings at the same time. Besides that, this particular recipe allows for any casing to be cleaned thoroughly, as it does not damage the finish on any given N-64 controller. However, the Nintendo Power Golden Controllers and Millennium Edition controllers each have large, distinguishing stickers placed on them that may be removed by the cleaning agent. Caution is advised.
What you'll need:
1 Large Plastic Bowl. Large enough to hold all four controller halves with about 1 inch of room above them is preferable.
2 Quarts (946 mL) of 20 volume Hydrogen Peroxide with Phosphoric Acid. While it will not dissolve any plastics, it will dissolve anything attached to the plastics.
2 Tbsp. Oxy-cleaning detergent. When mixed with the Hydrogen Peroxide, it will react to the plastics, causing the removal of any grime, adhesive, wax, or other residues.
When the Peroxide and Oxy-cleaning agents are mixed into the bowl, they can be diluted with water to fill the bowl as much as is needed to immerse the controller halves. The plastic buttons can be soaked as well, but the jelly-tablets and electronic parts cannot be soaked.
Leave the plastic pieces to soak for 5 hours minimum, then remove and rinse clean.
NOTE: using bleach to clean plastics can ruin or them or make them brittle. Do not use bleach.
Aftermath
With all of the plastic pieces clean and dry, you can reassemble the controller. Simply insert the plastic buttons, followed by the jelly tabs and then the circuit board. After you install the joystick, you can put the jelly tabs back on the L, R, and Z button contact pads, and re-insert them into their designated slots. Finish installing all of the buttons in the casings (the Z button goes on the rear-half), snake the cable back around the two supporting posts in the top of the controller, and re-install the back. After all nine of the screws have been tightened, you can test the operation of the controller.
Viola! You have just successfully cleaned and re-assembled a working N-64 controller.
A special "Thank You" is extended to Cleril, Marter, and Lord Krunk, all of whom I was able to take Forum Coding information from to make this guide possible.
N-64 console picture provided by www.toy-tma.com
Millennium Edition Controller Promotion Poster image provided by t2.gstatic.com
All other photos courtesy of myself.
N-64 console picture provided by www.toy-tma.com
Millennium Edition Controller Promotion Poster image provided by t2.gstatic.com
All other photos courtesy of myself.
<a href=http://www.escapistmagazine.com/forums/read/326.259037-Reviews-From-The-Backroom-Dune-2000#9762526>Dune 2000 - <a href=http://www.escapistmagazine.com/forums/read/326.260724-Reviews-From-The-Backroom-EarthSiege-2>EarthSiege 2 - <a href=http://www.escapistmagazine.com/forums/read/326.262850-Reviews-from-the-Backroom-Deus-Ex>Deus Ex - <a href=http://www.escapistmagazine.com/forums/read/326.264365-Reviews-from-the-Backroom-Descent-3>Descent 3 - <a href=http://www.escapistmagazine.com/forums/read/326.265665-Reviews-from-the-Backroom-Max-Payne>Max Payne - <a href=http://www.escapistmagazine.com/forums/read/326.267198-Reviews-from-the-Backroom-Homeworld-Cataclysm>Homeworld: Cataclysm - <a href=http://www.escapistmagazine.com/forums/read/326.268732-Reviews-from-the-Backroom-Command-Conquer-Renegade>Command & Conquer - Renegade - <a href=http://www.escapistmagazine.com/forums/read/326.270183-Reviews-from-the-Backroom-Jurassic-Park-Trespasser>Jurrasic Park: Trespasser - <a href=http://www.escapistmagazine.com/forums/read/326.273293-Reviews-from-the-Backroom-Metroid-Fusion#10555161>Metroid Fusion - <a href=http://www.escapistmagazine.com/forums/read/326.274847-Reviews-from-the-Backroom-Half-life-Expansions-Part-1-Blue-Shift>Half-Life: Blue Shift - <a href=http://www.escapistmagazine.com/forums/read/326.276170-Reviews-from-the-Backroom-Half-life-Expansions-Part-2-Opposing-Force>Half-Life: Opposing Force